Berries andPie

baking, cooking, recipes, eating, and obsessing over food

Showing posts with label Recipes. Show all posts

Monday, May 11, 2009

Apricot Jam and Chocolate Cupcakes with Rosewater and Vanilla Bean Buttercream

Apricot Jam and Chocolate Cupcakes with Rosewater Buttercream Icing :D

Yup! Say that 5 times fast!

After a weekend of spectacularly failed macarons, I was left with containers full of delicious buttercream filling in my fridge. Lacking my planned home-cooked Mothers' Day presents, the humble cupcake came swiftly to the rescue.

I can't admit to ever having made s cupcake entirely based around icing before, but I thought chocolate brown would look pretty against the pale marshmallow colours of my buttercream. While mixing the cupcake batter I thought of some apricot preserve leftover in the fridge from Easter's hot-cross buns; I thought it might add a bit of interest.

This is a really light and moist cupcake recipe and, as they cook, the jam mixes in with cupcake batter, falling to the bottom of the patty-pans. You end up with delicious fluffy bites of cupcake with a nice hint of warm apricot to follow each mouthful.

Apricot Jam and Chocolate Cupcakes with rosewater and vanilla bean buttercream Icing

Makes 12

Apricot Jam and Chocolate Cupcakes with Rosewater Buttercream Icing :D

INGREDIENTS:

For the chocolate cupcakes:
- 125g self-raising flour
- 125g caster sugar
- 125g butter
- 2 eggs
- 3 tbspn orange juice
- 4 tbspn apricot jam
- 2 tbspn cocoa powder

For the buttercream icing:
(Adapted from the incredibly talented Tartalette)

- 1/2 cup (100gr) sugar
- 2 large egg whites
- 140g unsalted butter, at room temperature
- 1/4 tspn rosewater essence
- a few drops of red food colouring (it just depends on how coloured you want it)
- Innards (the seeds) of 1 vanilla bean

METHOD:

For the cupcakes :

  1. Preheat oven to 180C (conventional), and line a cupcake tray with patty-pans
  2. Combine the butter and sugar together in a mixing bowl and beat (using electric beaters if you have them) until pale and creamy.
  3. Add the eggs in, one at a time, beating until fully combined after each.
  4. Sift in the flour and cocoa powder, and add the orange juice; stir until fully combined and the batter is smooth.
  5. Divide the mixture into the prepared cupcake tray holes.
  6. Put about 1/2 tspn of jam onto the top of each cupcake (I used my finger to make a little well in each). You may find this easier if you microwave the jam for about 15 seconds, or heat it over the stove until it's at a honey-like consistency.
  7. Bake your cupcakes for 15-20 minutes. They're done when puffed and the centres are springy to the (gentle) touch. If unsure, insert a skewer halfway in, and check it comes out with no wet cupcake batter (just remember the jam - it will still be wet)
  8. Allow to cool in the pan for a couple of minutes (only so you don't burn your fingers like me!) and turn onto a rack to cool.

For the buttercream icing:

  1. While cooling, you can make your icing! Place a mixing bowl over a saucepan of simmering water, making sure your saucepan doesn't touch the water.
  2. Place your egg whites and sugar in the bowl and whisk/beat until the it feels hot to the touch, and the mixture looks like what Tartalette describes as "marshmallow cream". This will take about 2 minutes. Remove from the heat
  3. Using an electric mixer beat the mixture until you have a very thick, very sticky meringue that forms stiff peaks, and it has cooled. This will take about 5 minutes.
  4. Add your butter, about a tbspn at a time, making sure it is fully combined after each addition. Continue to beat for 5-10 minutes until thick and smooth. Divide your mixture into halves.
  5. To one half, add the food colouring and rosewater essence, and beat for a further minute to fully combine
  6. To the remaining half, add the vanilla bean innards, or vanilla essence, and beat for a further minute to fully combine.
  7. Once your cupcakes are cooled, you can ice them with the buttercream however you like. I piped mine on with a 1cm plain nozzle.

NOTES:

While I've used apricot preserve, there's no reason you couldn't use something else, or leave it out altogether.

Like all cupcakes, these are best eaten same day, but I find these tend to stay nice and moist for a couple of days. If they're getting towards the end of their lifespan, I microwave them for 10-15 seconds and they become nice and warm and soft.

I'd suggest icing these when you're ready to eat them. The buttercream really needs to be refridgerated, but that's not the best place for cupcakes.

If you're not going to use the buttercream immediately you can keep it in the fridge for about a week, or freeze for up to a month.

Wednesday, May 6, 2009

How to Make a Bouquet Garni

Bouquet Garni - Simple and Easy Chicken Stock

A Bouquet Garni ('garnished bouquet' in French) is a small bunch of fresh or dry herbs which are used to flavour stocks and stews.

Traditionally a bouquet garni contains a few sprigs of parsley, thyme, and a bay leaf, but you can change it to taste, mix it up, whatever you want (well, not quite, but you get the point). You'll often see instructions tell you to wrap the herbs in a stick of celery, or a piece of leek, but I can't say I've ever bothered!

It's really hard to get wrong, but the point of it is to season your dish; not overpower it. I generally use what I have in my garden and know will compliment whatever recipe i'm making.

So, my 'recipe' for a bouquet garni goes something like this:

YOU WILL NEED:
- 2 sprigs of parsley
- 2 sprigs of thyme
- a bay leaf (dry or fresh, it doesn't really matter)
- a sprig of rosemary
- a few inches of kitchen string

METHOD:
Now these are the steps - focus hard:

  1. 1. Bring the herbs together in a bunch
  2. 2. Tie together using the kitchen string

Easy-peasy!

NOTES:
I use fresh herbs. If you're using dry herbs, wrap them up in a piece of cheese cloth or muslin and tie the opening up with string.

You can really add or remove what you like. I often don't have parsley, so I just leave it out. If I have some fresh oregano, I often throw it in. Unorthodox, I suppose, but it tastes good, so who cares?

RELATED POSTS:

Super-Duper Simple & Easy Chicken Stock

Monday, May 4, 2009

Super-Duper Simple & Easy Chicken Stock

Bouquet Garni - Simple and Easy Chicken Stock

You can feel winter in the air here early in Sydney, and boy did it come quick. I absolutely love it! There's nothing like curling up on the couch with a doona, a good book or movie, and a beautiful hot meal at the end of the day.

One of the staples of our winter food is, of course, stock. We use it for soup, risotto, stews, you name it; last year I started making my own chicken stock. The taste compared to store bought stock is lovely, and gives our risottos the most beautiful full flavour.

You may already have most of what you need in the fridge and cupboard already, and it's so easy to make. All you need is a bit of time. Bonus - it's also really cheap to make!

Super-Duper Simple & Easy Chicken Stock

Makes about 2L

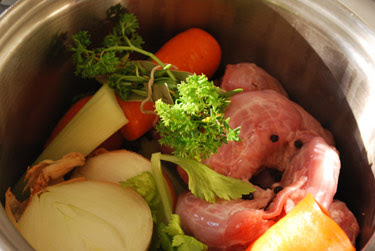
Chicken stock - all the ingredients in the pot - next step, cover with water and simmer

INGREDIENTS:

- 1 Chicken carcass or 500g of chicken bones/necks
- 2 medium size carrots, chopped roughly (cut each into 2 or 4)
- 2 sticks of celery, chopped roughly, as above. You can leave some leaves on.
- 1 brown onion, halved
- 10 peppercorns
- Bouquet Garni
(to the rest of us, just use a bay leaf, a sprig of parsley, a sprig of thyme, and a sprig of parsley if you have it. Don't worry too much if you're missing 1 or 2, it does help add to the flavour, though. If you can't get these it's not the end of the world if you used a half to 1tspn each of dried).

QUICKLY, BEFORE WE START:

If you're using bones/necks/etc:
This recipe says to use a chicken carcass or bones. Use whatever you can get your hands on, just remember we're after the boney bits (though using drumsticks with meat on is absolutely no problem). I've used necks this time round.

If using a carcass:
If you're using a chicken carcass, a BBQ or roast chicken is fine. Just make sure you remove any leftover skin, pick the bones for meat, and remove the stuffing from the cavity.

METHOD:

  1. Place all ingredients in a large pot, cover with about 2.5L cold water (just as long as everything is covered), and bring to a light boil. Immediately reduce the heat so the water is barely simmering.
  2. Reduce heat, cover, and allow to simmer slowly for 3-4 hours. Check from time to time; if froth appears on top, just skim it off with a spoon.
  3. Pour stock through a strainer to remove vegetables and bones, and voila! You're done!

NOTES:

The stock will keep in the fridge for 2 days, but is fine in the freezer for months, just divide into portions and freeze ahead. It means you always have good quality chicken stock on hand, too! If you do refridgerate it, it will allow any fat to set, and you can skim it off the top before freezing.

Simmer the stock lightly, and don't boil, so we end up with a nice clear stock. Boiling makes it cloudy.

There is another reason making your own is so great: it's REALLY cheap. You can get chicken bones and necks for a couple of dollars a kilo from your butcher, or, if you go up to the deli and butcher section, Coles often have them too.

RELATED POSTS:

How to Make a Bouquet Garni

Wednesday, April 15, 2009

1 a Penny, 2 a Penny - Hot Cross Buns!

Oh dear, where has this year gone so far? The end of Christmas and the beginning of the new year has been full speed ahead and nothing less than a mad start for me! Well, somehow it's Easter already, and some seasonally appropriate baking seemed the way to go. Hot Cross Buns are the highlight of my husband's year; he adores them, and normal fruit bread just isn't quite the same. With this in mind I decided to make my first real attempt at the sweet fruity buns, and, much to my surprise I might add, they turned out splendidly. I used a recipe from Taste.com.au. While, yes, these were time consuming, they were very easy to make. And there is nothing quite like bread fresh from the oven! I substituted pre-packaged mixed peel with dried apricot, and used the fresh zest 1 lemon and 1 orange. Enjoy!

Tuesday, October 28, 2008

Fig & Gingerbread Biscuits

Fig and Gingerbread BiscuitsAs the weather heats up and Christmas draws ever closer, my desire to cook seems to rise with the mercury. So it was, when my Mum told me about some fig and ginger biscuits she was enjoying, I was inspired to create my own version.

Last year around this time Fiona, from The Grape and The Grain, and I found a seriously amazing recipe with a twist on gingerbread. It's quickly became s favourite! I made this for 2 friends and my hubby last year to find it had dissapeared only moments later. The delicious bite sized pieces do make this quite easy, though!

While not the prettiest biscuit, their spicy lovliness and the slight crunch of the fig seeds are really quite enticing, if I can say so myself! My recipe is really quite similar to the original with a couple of extra ingredients.

Ingredients - 1 cup chopped dried figs - 1/2 cup chopped crystalised ginger - 1/4 cup golden syrup - 40g brown sugar - 20g butter - 100g plain flour - 1tbsp self-raising flour - 1/4 tbsp bicarbonate of soda - 1tbsp dried ground ginger - 1/4tbsp cinnamon and 1/4tbsp allspice OR 1/2tbsp mixed spice - 1 egg yolk

Makes about 15-20.

Method 1. Preheat oven to 160°C, and line a baking tray with non-stick baking paper.

2. Combine the golden syrup, brown sugar, butter and figs in a saucepan over low heat; stir until the butter is melted, sugar disolved and figs coated. Remove from heat and allow to cool a little while you complete the next step.

3. Sift flours, bicarb and spices into a bowl

4. Stir the egg yolk through the syrup/fig mixture and add to flour, along with candied ginger. Stir the ingredients until combined, use your hands to form a dough if needed.

5. Roll tablespoon(ish) sized balls of the dough, and place about 1 1/2 inches apart on the baking tray.

6. Bake for 15 minutes, until golden. Remove from oven, and allow to cool on trays

7. Enjoy!